I've been revising some of my thinking about leathering, but I might make a short post later tonight. I've also been spending the last few days pondering how I'm going to do the breast/backplate closures and the girth hoop closures.
Last night I bought a pile of fabric for making a tunic and/or part of a subarmalis. I've been thinking about making a subarmalis loosely patterned on a greek linothorax/spolas as sort of a "dressy undress uniform". We'll see how it goes. Might pick up some more fabric/materials tonight.
Tuesday, 9 August 2011

Saturday, 6 August 2011
Adventures in Leathering and Assembly

OK - As previously mentioned, I put holes in the lesser shoulder plates according to a pattern I was working from, and that turned out to have been a poor choice. Anyways, no pictures of that process, but I will be outlining a leathering method of my own devising in the next post. Above is our starting point - for better or worse, the lesser shoulder plates are assembled, and now we want to attach the upper shoulder guard and breastplate assembly. As you can see above, I've laid the plates out flat so I can check how they are lining up while still accessing the central leather. In this pic I've already marked and cut the holes on the central leather - that's the easy part. Now we need to do the sides.
As you can see in the picture above, (and in several other pictures from recent posts) I sort of traced the strap outlines on the breast and back plates -- this was done while holding them upright (as though the shoulder was being worn). After I marked the outline of where the strap would run, I eyeballed it and marked an "X" for the riveting point near the center of the plates.
After drilling the holes, I repeated the "hold upright and lay strap against plate" process, but this time I used a screwdriver to push through the new hole in the plate and mark the location on the strap. Then all that remained was to punch the hole in the strap and connect the plates.
Below, I have connected the breast plates to all three leathers. It's now time to attach the front and rear leathers to the upper shoulderguard - which turned out to be the most annoying part of the process of all. Below, all plates are attached on the central leather -- only the front and rear leather remain to be completed.

I planned to use the same technique -- I'd fold the plates up as though the shoulder was being worn, and then mark the outlines of the strap on the plate. This turned out to be a lot more difficult than I thought, with plates flapping all over the place, lames twisting out of true alignment, etc. Then I tried setting the whole unit on a stump and tried to let gravity do the work for me:
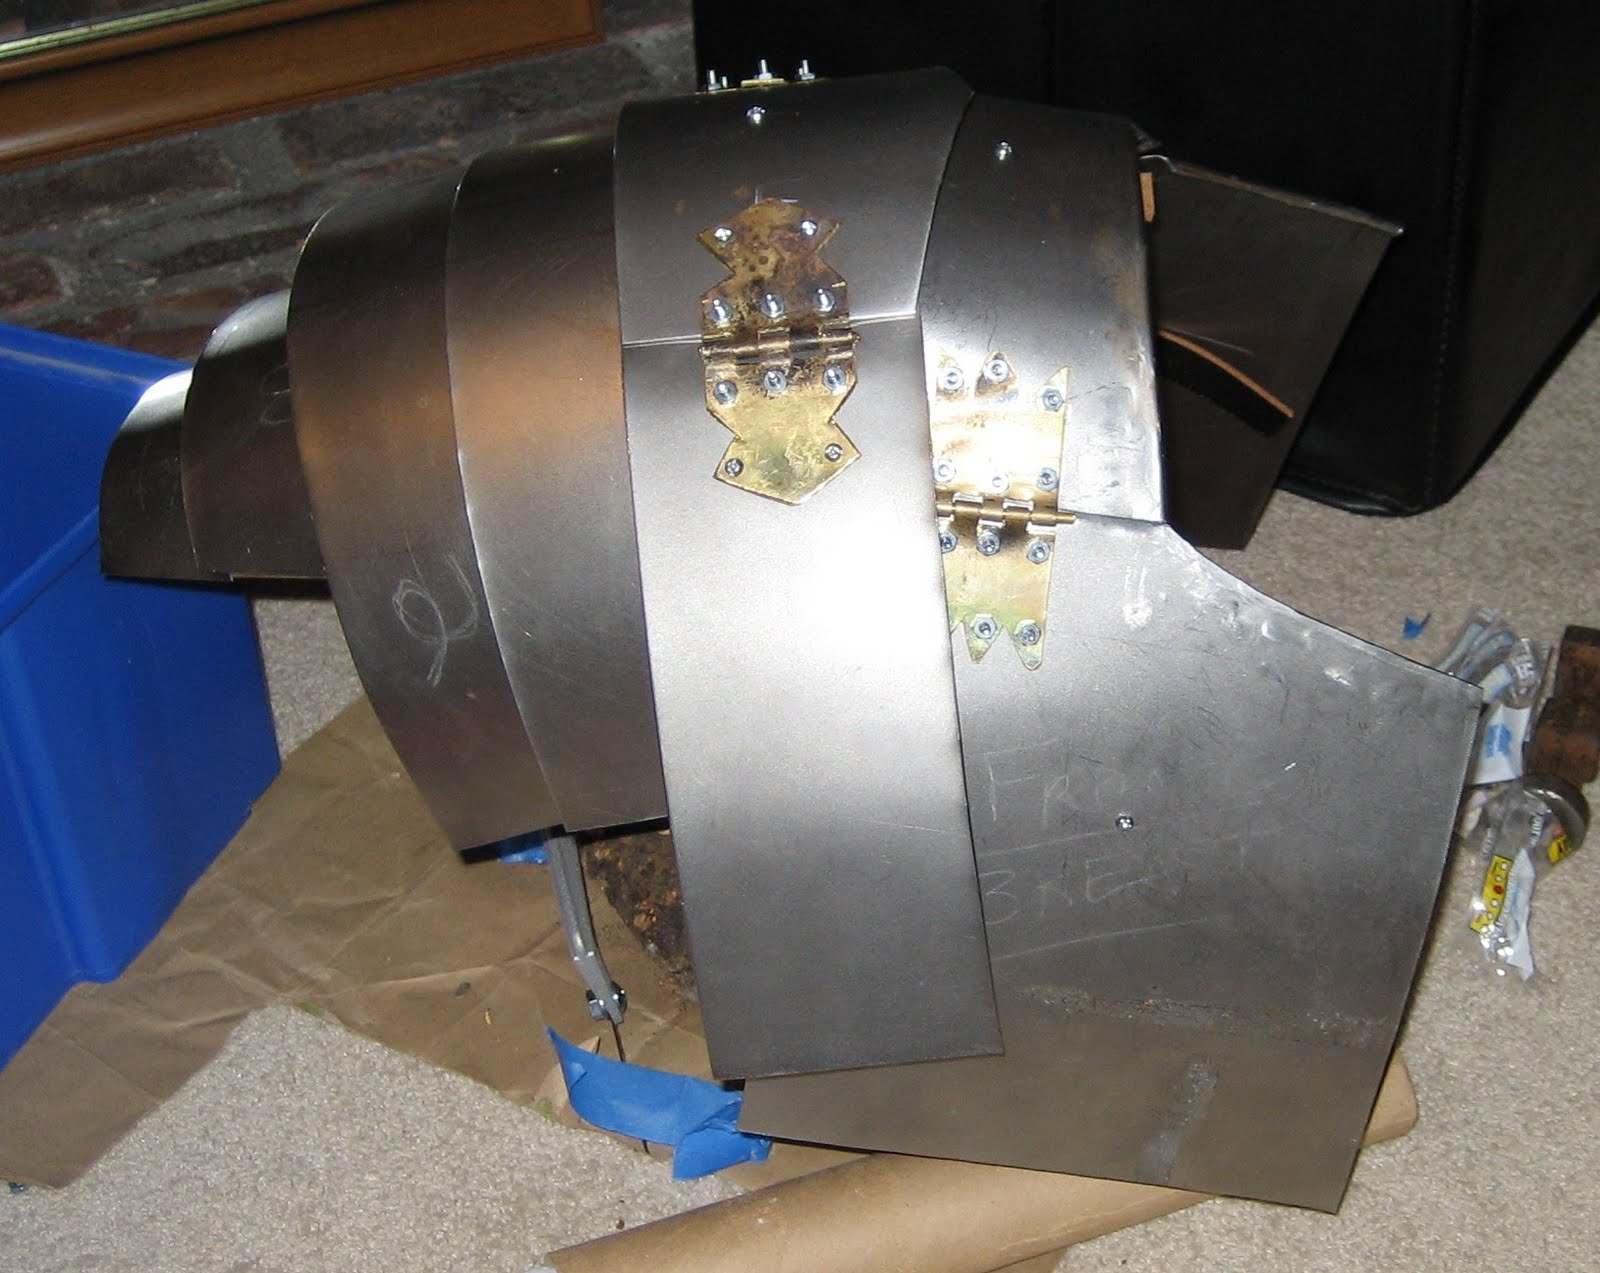
Unfortunately, this made it more or less impossible to see or reach the parts I needed to reach. Part of the problem here was in getting the upper shoulder to lie down properly on the collar pieces -- I'll talk more about that in a moment. Anyways, after several minutes of hell trying to figure out how to do it I applied some engineering wisdom and solved the problem with duct tape.

That let me get inside to mark the outlines of the straps with my piece of soapstone.

However, while I was in there, I noticed a major problem in the making:

One of my leathers was running right across the corner of a plate, right along the hinge line. That would probably wear out the strap and break it in no time!
So when I marked the riveting point on the upper shoulder, I deliberately put it a bit low on that side to force the leather to move away from the hinge line.

The moment of truth!


So there's a couple of problems with this shoulder. The top two issues:
1. Upper Shoulder Doesn't Fit Well.
This is because I took what is essentially a Corbridge A shoulder unit and attached it to a Newstead breast/collar/back plate set. The central upper shoulder plate isn't wide enough to match the curve of the mid collar plate - In order to make things lie nice and flat, the upper shoulder front & back plates would have to make a sharp curve right in the middle of the hinge face.

2. Lesser Shoulder Plates Don't Hang Properly

There are several potential causes for this, not least of which is wrong holes, wrong leather, wrong angles, etc. Solving this issue is the topic of my next post.
Friday, 5 August 2011
Second Set of Breast/Back/Collar Plates (Long Weekend Part 3 of 3)
I cut out the three plates - breast, midcollar, and back as before. I made an error on the breastplate's neck hole - since it wasn't fatal I decided to ignore it since this is a prototype unit anyways. However, I did fold it a bit differently to try to hide the error, as shown below. Purple line indicates approximately where I should have made the original cut, which I hid by progressively shrinking the width of the fold.

As previously mentioned, I attempted to copy the folded & flared look shown in Peter Connelly's drawings of lorica segmentatae. This turned out to be easier than I expected, although I still managed to make a mistake or two in my rush to get these pieces done. For the first plate, I folded the edges as described in this post, except that I switched to the planishing hammer much earlier -- when the fold was still about 45 degrees away from being finished. This resulted in a much neater edge, as seen above.
To flare the edge, I positioned the plate on the anvil such that the fold was hanging over the edge a little bit. (Sorry, no action shot. Maybe next time.) Some gentle hammering along the edge of the closed fold was enough to flare the metal over the edge of the anvil, resulting in exactly the desired result. The trick here is to move the plate along the edge of the anvil to follow the curve of the neck so that you end up with a flare with a constant width. Results are illustrated below.

On the second and third plate, I speeded up this process by starting the flaring before the fold was completely closed -- basically I merged the flaring passes with the last couple of fold-closing passes. This turned out just fine, so I will probably continue to do things this way from now on.

I had originally intended to practice rolling edges a bit more, but since that takes much more time & effort I decided to skip it this time. Perhaps I will practice it on the edge of a lesser shoulder guard plate later on.
When I got home and compared my two sets of backplates, I realized I had made a very basic error -- my folded edges were at slightly different heights because I didn't bother to check the second one against the first one. I guess if I had cut out and hammered both left and right sides at the same time, I wouldn't have made this mistake, but it's something to keep in mind in the future.

Comparison of the mostly-assembled first shoulder and the new neck plates.


As previously mentioned, I attempted to copy the folded & flared look shown in Peter Connelly's drawings of lorica segmentatae. This turned out to be easier than I expected, although I still managed to make a mistake or two in my rush to get these pieces done. For the first plate, I folded the edges as described in this post, except that I switched to the planishing hammer much earlier -- when the fold was still about 45 degrees away from being finished. This resulted in a much neater edge, as seen above.
To flare the edge, I positioned the plate on the anvil such that the fold was hanging over the edge a little bit. (Sorry, no action shot. Maybe next time.) Some gentle hammering along the edge of the closed fold was enough to flare the metal over the edge of the anvil, resulting in exactly the desired result. The trick here is to move the plate along the edge of the anvil to follow the curve of the neck so that you end up with a flare with a constant width. Results are illustrated below.

On the second and third plate, I speeded up this process by starting the flaring before the fold was completely closed -- basically I merged the flaring passes with the last couple of fold-closing passes. This turned out just fine, so I will probably continue to do things this way from now on.

I had originally intended to practice rolling edges a bit more, but since that takes much more time & effort I decided to skip it this time. Perhaps I will practice it on the edge of a lesser shoulder guard plate later on.
When I got home and compared my two sets of backplates, I realized I had made a very basic error -- my folded edges were at slightly different heights because I didn't bother to check the second one against the first one. I guess if I had cut out and hammered both left and right sides at the same time, I wouldn't have made this mistake, but it's something to keep in mind in the future.

Comparison of the mostly-assembled first shoulder and the new neck plates.

Thursday, 4 August 2011

Tuesday, 2 August 2011
Learning from my mistakes - First shoulder unit. (Long Weekend Part 2)
Next time I will do the leathering more sensibly and take pictures along the way. For now, I will just give a summary of things I've learned from attempting to assemble my first complete shoulder unit.

1.
I had (unwisely) punched holes in my shoulder lames according to the pattern I was working from, and as a result my leathering did not turn out as quite as smoothly as I had hoped. One of the more noticeable issues is that part of the side straps are visible between lesser shoulder plates 3 & 4 because the holes were too close to the edge of the plates. In the future, I will follow the more sensible advice from Alex Matras in his pdf - more on that in a future post.

2.
Less obvious is the slight bunching/twisting (shown above) of the shoulder leather to reach the holes in each lame. This may look like I just goofed up on placing the holes in the leather, but the actual problem is that the leather is trying to bend in a zig-zag pattern to reach the holes. I think this is what is causing the shoulder to be so stiff - Note how in this picture (further above), the lesser shoulders remain horizontal even when unsupported, instead of drooping to cover the upper arm. My choice of leather may also be to blame for this issue - perhaps I should have used something softer and more flexible? (i.e. thinner)
--------------------------------------------------------------------


3.
Attaching hinges to the breastplate - I had a bit of trouble trying to get the hinged breastplate/backplate sections to overlap correctly with the mid-collar plate. The biggest problem was that I had put the rivet holes in the hinge plate very close to the hinge tube, making it difficult to get an overlap which would not bump into the rivets as seen in my previous post about the upper shoulder. I should be able to correct this on my next set of hinges by placing the rivet holes a bit further back from the hinge tube, giving me more room to work with.
The other issue with making these plates overlap is getting the folded edges to play well together. You can see in some of these pictures that I had to bend one plate a bit to make things snug up properly.
Also seen in the above pictures -- Markings for leathering attachments. This post is already getting pretty long so I'll talk about those later.
I will also need to purchase more nuts & screws -- I have used up 48 of them just for these four hinges! Upon checking diagrams of historical hinges, I realized that there should only be five instead of six -- oh well. As previously mentioned, these weren't historically accurate shapes anyways.
Below - closeup of my unfinished "Kalkriese-Inspired" hinge on the breastplate/midcollar plate. You'll note that I haven't even peened the hinge pin on this one. In the background you can see where I've marked the leathering point on the backplate.

----------------------------------

4.
Folding the mid-collar plate. You can see here (above) that I ended up with a few kinks in my nice folded edge. These were introduced while I was bending the plate, despite attempting to avoid this exact problem. I wonder if I should be folding the edge on this part AFTER it has already been bent... that would be much harder, though. Maybe I should start the fold, but leave it not quite closed? Now that I've thought about it some more, I suspect the kinks formed in places where I had dinged the fold a bit, creating stress concentrators. Maybe a better-finished fold would kink up less? Anyways, this is something I'll have to ponder after I've tried again with my second mid-collar plate.
Next post - Conclusion of progress from the long weekend. I will talk about about the new breast/back plate combo I made and hammered. After that - Installation of the final leathering points on the back/breastplate and upper shoulder guard.

1.
I had (unwisely) punched holes in my shoulder lames according to the pattern I was working from, and as a result my leathering did not turn out as quite as smoothly as I had hoped. One of the more noticeable issues is that part of the side straps are visible between lesser shoulder plates 3 & 4 because the holes were too close to the edge of the plates. In the future, I will follow the more sensible advice from Alex Matras in his pdf - more on that in a future post.

2.
Less obvious is the slight bunching/twisting (shown above) of the shoulder leather to reach the holes in each lame. This may look like I just goofed up on placing the holes in the leather, but the actual problem is that the leather is trying to bend in a zig-zag pattern to reach the holes. I think this is what is causing the shoulder to be so stiff - Note how in this picture (further above), the lesser shoulders remain horizontal even when unsupported, instead of drooping to cover the upper arm. My choice of leather may also be to blame for this issue - perhaps I should have used something softer and more flexible? (i.e. thinner)
--------------------------------------------------------------------


3.
Attaching hinges to the breastplate - I had a bit of trouble trying to get the hinged breastplate/backplate sections to overlap correctly with the mid-collar plate. The biggest problem was that I had put the rivet holes in the hinge plate very close to the hinge tube, making it difficult to get an overlap which would not bump into the rivets as seen in my previous post about the upper shoulder. I should be able to correct this on my next set of hinges by placing the rivet holes a bit further back from the hinge tube, giving me more room to work with.

The other issue with making these plates overlap is getting the folded edges to play well together. You can see in some of these pictures that I had to bend one plate a bit to make things snug up properly.
Also seen in the above pictures -- Markings for leathering attachments. This post is already getting pretty long so I'll talk about those later.
I will also need to purchase more nuts & screws -- I have used up 48 of them just for these four hinges! Upon checking diagrams of historical hinges, I realized that there should only be five instead of six -- oh well. As previously mentioned, these weren't historically accurate shapes anyways.
Below - closeup of my unfinished "Kalkriese-Inspired" hinge on the breastplate/midcollar plate. You'll note that I haven't even peened the hinge pin on this one. In the background you can see where I've marked the leathering point on the backplate.

----------------------------------

4.
Folding the mid-collar plate. You can see here (above) that I ended up with a few kinks in my nice folded edge. These were introduced while I was bending the plate, despite attempting to avoid this exact problem. I wonder if I should be folding the edge on this part AFTER it has already been bent... that would be much harder, though. Maybe I should start the fold, but leave it not quite closed? Now that I've thought about it some more, I suspect the kinks formed in places where I had dinged the fold a bit, creating stress concentrators. Maybe a better-finished fold would kink up less? Anyways, this is something I'll have to ponder after I've tried again with my second mid-collar plate.
Next post - Conclusion of progress from the long weekend. I will talk about about the new breast/back plate combo I made and hammered. After that - Installation of the final leathering points on the back/breastplate and upper shoulder guard.
Hinge Plates - Improved Manufacturing (Long Weekend Update Part 1)

In preparation for the next breast/back plates, I cut out some more brass for hinges. These are a fair bit wider than some of the earlier ones - I think I will try to make these into carlisle-style hinges. Anyways, I took a slightly different approach to making these hinges and it turned out much faster than the previously detailed method. The finished plates also look better than my previous attempts, in part because the painter's tape in step#5 reduced the number of hammer marks left on the tube and plates. Documented below is the "new and improved" hinge-making method. I skipped pictures for most of these steps, since they are already documented in detail in the posts starting here.
1. Measure & Cut brass plates and hinge pin.
2. Anneal middle of plates until literally red hot, then quench in water. Ditto for the ends of the hinge pins.
3. Mark middle line on hinge plate and hand-fold it over.
4. Use a rubber mallet to further fold and flatten on a "soft" surface - I used a piece of firewood as my base.

At right - rubber mallet. I bought this many years ago and I can't remember why. Anyways, this weekend it finally proved its worth. Much faster than the jeweller's pliers and better results, too.
5. Insert hinge pin, and apply painter's tape to help hold it in place.
6a. Use radiused head of brick hammer to finish flattening the plate, starting near the middle of the plate and working in towards the tube/pin.
6b. Use the brick hammer's wedge to finish forming the tube. You will probably need to stop and flatten the hinge plate once or twice while doing this. Pictures from the last thread.
7. Tap the top of the hinge tube gently to free the hinge pin. If your hinge pin is already loose, you probably still have room to close the tube a bit more.
8. Lay _half_ the hinge plates on top of your paper guide and mark the slots for the tubes. Do not mark the other half of the plates at this time.
9. Cut the tube slots on the marked plates. Make sure the cuts are all the same depth.


10. Lay your cut plates out flat and pair them up with the uncut plates, and mark the cuts for those. At this point it's a good idea to keep track of which plate goes with which, to get the best fit.
11. Cut the second set of plates and compare them with their mates. Make any necessary adjustments to the size of the tube "teeth".
12a. Using a combination of dremel and cold chisel, nip off the unwanted tube sections. Note that you will need a backstop softer than the chisel -- I used a hunk of aluminum that was donated to me.


I found a reversible nail set which would also accept my homemade cold chisel. This made this step go a lot faster and helped save wear on the hammer face. After nipping off the tubes, I used the dremel to smooth off the cut surfaces.
12b. Flatten the hinge plates again if needed. (Using a cold chisel will often bend the plates slightly.) Try inserting the hinge pin (one hinge plate at a time) to see if you've gotten things back into alignment.
13. Perform final cleanup with needle files. Test fit your hinges and insert the hinge pin.
14. Cut hinge plates into final shape. (Coming in a future update...)
Monday, 1 August 2011
Progress
I have one shoulder unit assembled, and all the hammer work done for the next one. Pictures and details coming tomorrow-ish.
Subscribe to:
Posts (Atom)