Showing posts with label anvil. Show all posts

Sunday, 16 October 2016

Bottom Girdle Bands - More Hammerwork!

As mentioned on Satuday, I decided that a seventh set of girdle bands was required.  Since I'm rather taller than the average roman, this wasn't too surprising.  Fortunately I still had some of the original material carefully packed away, so measuring and cutting two additional bands wasn't a big deal.

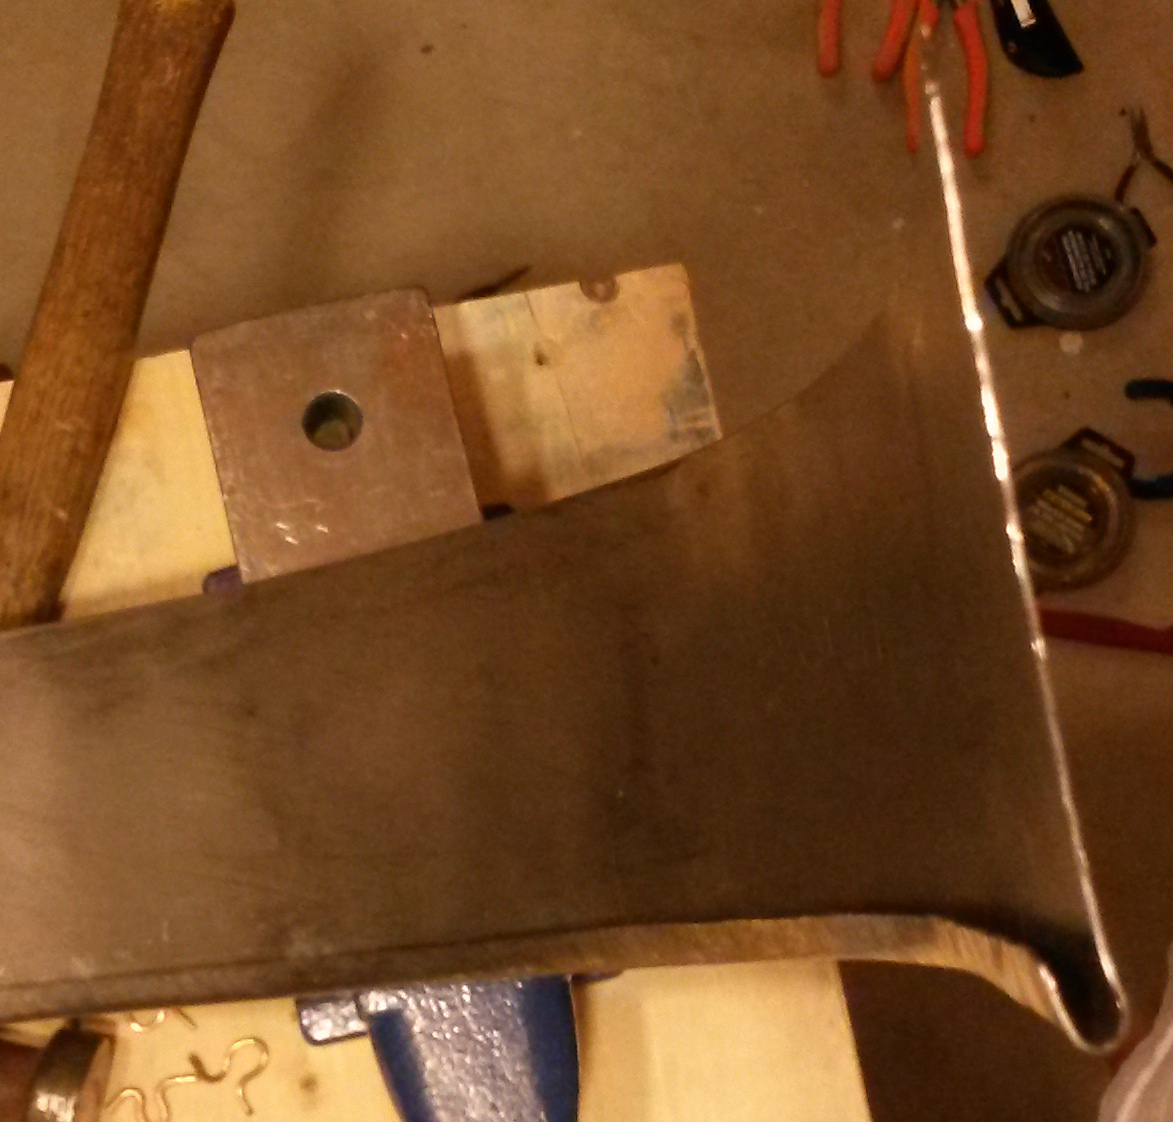
What promised to be slightly more arduous, however, was the task of finishing their bottom edge. I wanted to have something that would be gentle on my fabric (and flesh), so I determined that I should invest the time in adding a folded and flared edge similar to the 'better half' of my neck plates.  I was a bit worried about remembering how to do this until I recalled that I documented it all. For reference -  my previous posts here and here, and helpful resource linked from those posts (here).

First, I marked a line and started the bend.  We only want to do a little bit on each pass.


A bit more progress on the second pass...


Pass #3:


Here in the fourth pass or so we're finally starting to curl past 90 degrees.


Now we're starting to close the fold...


Add in the flare as we close some more...


And go for the kill with last few passes... almost there!


Done!


Suffice it to say that I also did the second (matching) girdle band.  I'm going to take a break from this image editing etc. and continue in the next post.  See you later, folks!


Tuesday, 30 August 2011

Cottage Part 2: Girdle Vertical Connectors (Hooks)

Now that I had two more-or-less complete shoulder sections, it was time to start thinking about the girdle section.   The first stop on that train of thought was connecting the girdle to the shoulders.  (What's that? I skipped the part about connecting the shoulders to each other first?  Stay tuned for the next update!)

For Newstead and/or Corbridge B/C, the girdle hangs from the shoulders via hooks and eyes.  As suggested by Matthew Amt, I made these by flattening one end of a 3/16" brass rod, annealing 3 or 4 times during the process.  Below is the first hook after hammering... you can see I wasn't hitting it very straight in the early stages since it looks a little lopsided.


Fortunately the lopsidedness doesn't matter since this will be going on the inside of the girdle band.  Following the much discussed but never published Stillfried artifacts, my hooks are riveted on the inside and then pass through the girdle band itself, as shown below.


For the sake of simplicity I put a 7/32" hole in the band to provide some additional wiggle room for the bent shaft.

I have installed my hooks with screws for the moment since I plan to anneal the rod shaft before doing the final bending -- which will happen after the girdle sections are assembled.  Below - one of my work stations up at the cottage, with more hooks in progress.


For now the matching eyes for the hooks are simply holes punched in the back and breast plates.  I will add the decorative brass work a bit later -- ideally after I've figured out how to get my repousse work to really pop out the way I want it to.


Friday, 5 August 2011

Second Set of Breast/Back/Collar Plates (Long Weekend Part 3 of 3)

I cut out the three plates - breast, midcollar, and back as before. I made an error on the breastplate's neck hole - since it wasn't fatal I decided to ignore it since this is a prototype unit anyways. However, I did fold it a bit differently to try to hide the error, as shown below.  Purple line indicates approximately where I should have made the original cut, which I hid by progressively shrinking the width of the fold.


As previously mentioned, I attempted to copy the folded & flared look shown in Peter Connelly's drawings of lorica segmentatae. This turned out to be easier than I expected, although I still managed to make a mistake or two in my rush to get these pieces done. For the first plate, I folded the edges as described in this post, except that I switched to the planishing hammer much earlier -- when the fold was still about 45 degrees away from being finished. This resulted in a much neater edge, as seen above.

To flare the edge, I positioned the plate on the anvil such that the fold was hanging over the edge a little bit. (Sorry, no action shot.  Maybe next time.) Some gentle hammering along the edge of the closed fold was enough to flare the metal over the edge of the anvil, resulting in exactly the desired result. The trick here is to move the plate along the edge of the anvil to follow the curve of the neck so that you end up with a flare with a constant width.  Results are illustrated below.


On the second and third plate, I speeded up this process by starting the flaring before the fold was completely closed -- basically I merged the flaring passes with the last couple of fold-closing passes. This turned out just fine, so I will probably continue to do things this way from now on.


I had originally intended to practice rolling edges a bit more, but since that takes much more time & effort I decided to skip it this time. Perhaps I will practice it on the edge of a lesser shoulder guard plate later on.

When I got home and compared my two sets of backplates, I realized I had made a very basic error -- my folded edges were at slightly different heights because I didn't bother to check the second one against the first one.  I guess if I had cut out and hammered both left and right sides at the same time, I wouldn't have made this mistake, but it's something to keep in mind in the future.


Comparison of the mostly-assembled first shoulder and the new neck plates.


Wednesday, 27 July 2011

(Belated Weekend Part 3) My First Breastplate - Front & Rear

For the front breastplate I decided to try a much sharper fold.  Basically I repeated the steps from my previous post, except that the final passes involved smashing the fold with a 2-pound swedish crosspein hammer.  I will not be doing this again since it doesn't really save that much work and the result isn't nearly as attractive.


For the rear breastplate, I decided to try rolling the edge.  The first thing about this that I should mention is that I did it backwards -- I rolled it on the inside instead of the outside of the plate.  Oh well.

Rather than try to reinvent the wheel, I will direct you to read the armour rolling tutorial located here since that is what I was working from anyways.  Some pictures of the process:


Rebated cold chisel as my stake.


 Planishing hammer:
I had some trouble closing the roll properly, and I dinged it up a bit trying to convince it to obey me.  End result isn't terrible but is certainly not spectacular.  I will be practicing this some more in the future since it seems to be within my reach and has the potential to look great.


Anyways, below you can see all three plates laid back out on the table in their original configuration.  You can see how much metal was trimmed and folded!


Up next - attaching hinges and then leathering a complete shoulder section together.

(Belated Weekend Part 2) My First Breastplate - Midcollar


I started by cutting out a rectangular piece, and then broke it out into the separate sections.  This might seem like a mistake, since the midcollar plate has to slightly overlap the other two, but you will find that once you've accounted for material lost in folded/flared edges it won't matter.  The plate labelled "scrap" will probably be reused for a shoulder or manica lame(s) -- it's not actually going to waste.

PS - I am using soapstone to write on the sheet metal here.  This is convenient since you can remove it later with only a rag.

An important point to keep in mind about the breastplate sections is that they are going to be rubbing against your neck.  This is not a place where you want rough metal edges!  Typically ( and historically) these edges are finished slightly differently from other edges as a result.  There are three basic options:
  • Flared;
  • Folded; or
  • Rolled.
Since I don't like the "flared" look by itself, and since it is reputed to be significantly less forgiving of mistakes, I decided to ignore it in favour of practicing my folding and rolling.  On my next breastplate section I will attempt the combined folded and flared edging shown in the famous lorica segmentata diagrams by Peter Connolly.


Disclaimer:  I am not a smith of any sort, I'm just some guy with a bunch of newly-purchased hammers who read some tutorials on the interwebs.  I will be telling you how I have done things, and whether or not they worked for me.  That doesn't mean that they are the easiest or best way to get things done.

In this post, I will be covering the midcollar, where I chose to use a gentle fold for the part going against my neck.  Unfortunately it appears that I forgot to take a picture of starting the bend -- I'll remedy that in a future post.

Anyways, I used soapstone to mark a fold line about 1cm back from the edge.  Laying the plate more or less flat on the anvil, I shift it so that the fold line is level with the edge of the anvil.  (With that 1cm section hanging over the edge)  Once it is aligned, I can start lightly tapping along that overhanging edge, aiming just past the edge of the anvil. The key here is to do a little bit at a time along the whole edge. To better understand why this is necessary, please read the excellent writeup over here.  While you're there, read the whole rolling armour edges tutorial -- I certainly did.

Anyways, the trick is to just keep shifting that plate, keeping the fold line just on top of the edge of the anvil.  When you've completed one or two passes, you should have something like this:
Note: The edges of my brick hammer's face have been rounded out with files.  I should really radius and polish the whole face of the hammer before starting work on the final pieces.


After a few more passes, you should be approaching a 90° bend.


As you try to surpass that 90° mark, it might help to switch orientation with the fold on the face of the anvil, and the body of the plate hanging off the side:


After you reach that stage, you can lay the plate flat on the anvil and brace it with your hand.  You should be aiming the hammer for the top of the edge here -- be careful since a miss will likely ding the anvil.  Your hammer stroke should be expecting to "slip off" the top of the fold.


Getting closer -- Hammer strokes should still be slipping off the edge of the fold.


On the last two or three passes, be careful to strike along the edge, NOT directly on the fold.


If you did the last step correctly, you should have a nice-looking rounded edge:


Next update tomorrow-ish will cover the rest of the weekend material  (other two breastplate parts), and hopefully the assembly of a complete shoulder unit.

Tuesday, 26 July 2011

(Belated Weekend Part 1) Miscellaneous

As previously mentioned, I visited a friend's place on the weekend and did some work there last weekend. There are a lot of pictures so I'm breaking this up into several parts.  First, I'll deal with some miscellaneous stuff.

When I packed up all my gear and materials, I was surprised at how easily it could be collapsed into a transportable package.
  1. Brass Sheet (kickplate from a door?)
  2. The remainder of my uncut steel, about 2' x 2'.
  3. All hand tools and patterns fit into this plastic tray.
  4. Dremel Case and sketchbook
  5. Brass Rod Stock (1/8" & 3/16")


JB (my friend) has a very nice workshop, and a number of nice things that I don't - like a bench grinder.  When I was talking to him about my issues with hinges (specifically about nipping off the unwanted tube sections), he had a bright idea.  Since I was having trouble finding a cold chisel small enough, he pointed out that we could make one.

We started with this double-ended screwdriver bit, since it was some form of tempered steel that was already more or less the right shape. All that needed to be done was to put an edge on the flat end, and to grind down the phillips end as a strike point (so that it wouldn't ding the hammer face too much).  Anyways, this was fairly easy although a bit slow since we made very frequent pauses to dip the bit in water --  we wanted to keep it from getting too hot on the grinder and ruining the temper.

Below, you can see the results of our first test using a piece of aluminum as the strike plate.  (You want something softer than the chisel as the backstop...)  It works surprisingly well, too.


Not pictured - I made two more hinges, bringing my total up to 4.  This is to support the assembly of a complete shoulder section in the near future.


JB also had a small anvil which hadn't seen the light of day for a few years.  He dug it out for me and suggested that I put it to use -- he didn't have to ask me twice!

At left, I am radiusing one edge of the anvil very slightly.  This is to provide a smooth surface to bend metal over -- the unfinished edge would marr or possibly cut my work.

Next update:  Using that anvil!